How to record a piano in 2 steps
You want to know how to record a piano? Congratulations, it’s a great decision! Recording your digital piano indeed has many advantages that an acoustic piano doesn’t have, such as being able to obtain a pure electronic sound, without any parasitic noise related to surrounding sounds or the room’s acoustics. This major asset will therefore make the task much easier for you.
However, to best record a piano, you’ll need to follow several crucial steps. And since I woke up on the right side of the bed this morning, I’m going to do you the immense honor of explaining the procedure to follow. What, I’m not overdoing it there, am I? Well, come on… let’s get started!
1/ The equipment to record a piano
Recording your digital piano requires some essential tools that I’m going to list in this chapter.
The cables and the connections
The first thing to check is that your digital piano has a jack input. To verify this, it’s very simple. Does your instrument have a port to plug in headphones? In most cases, the answer is yes! If that’s the case, perfect – record a piano will be possible.
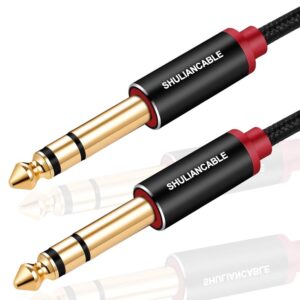
Next, you’ll need to get a jack cable. This will connect to your piano and to your sound card (we’ll cover this point later) and thus capture the sound you’re playing. You can even have fun recording other sounds on your piano like violin or organ!
The sound card
The sound card is an essential element if you want quality recording. And unfortunately, the sound cards that come standard on a computer are not sufficient. This device will therefore allow you to convert the analog signals from your piano into digital data usable on a computer.
It’s therefore important to choose a quality sound card, otherwise your sound output won’t be optimal. And the one that displays the best quality/price ratio in this field is undoubtedly the Focusrite Scarlett. Available in solo mode for mono recording, or in 2i2 mode for stereo recording, it’s up to you to see what you prefer. However, to record a piano, a single jack input will be enough!
Alternative to the sound card and jack input: MIDI format
MIDI? What’s this thing? The MIDI format (Musical Instrument Digital Interface) is a communication protocol allowing a connection between an electronic instrument and a computer.
Where the jack cable and sound card will record the audio from your instrument, a MIDI cable will transmit musical performance data. In other words, it will capture the notes you play, the intensity you put into them as well as their length.
Consequently, if your digital piano doesn’t have great quality sound or you don’t want to buy a sound card, the MIDI format could be a solution. Check for this that your instrument is equipped with a MIDI port (also called USB to host).
But as I told you, the MIDI format captures data and not sounds! How do you get piano sound from this then? Well it’s very simple, once you have your MIDI file, you just need to read it in music software (also called DAW, Digital Audio Workstation). This software will interpret this file and transcribe it, you’ll then just need to choose the instrument you want to hear (in our case, you’ll choose a piano sound).
Regarding the cable, it’s a simple USB type A to type B cable. A printer cable basically… So don’t bankrupt yourself with certain cables sold as “MIDI cables to record a piano” that will cost you 3 times more to produce exactly the same thing. You probably already have a cable like this at home!
Computer and software
Finally, the last device you’ll need to record a piano is a computer. On this, you can connect your sound card to retrieve the digital data from your recording.
To do this, you’ll need to use audio recording software. There are dozens of them, but to start, don’t complicate things and use Audacity. It’s free and extremely simple to use, which will allow you to record a piano with ease.
2/ How to best record a piano?
Now that you have all the necessary equipment, it’s time to get to work! As a reminder, you’ve connected your jack cable to your piano on one side, and to your sound card on the other. Then, you’ve connected your sound card to your computer, and you have recording software connected to it. If you’re using the MIDI method instead, you’ve simply connected your MIDI cable to your piano and to your computer, while having MIDI file reading software ready to use. Got it, are you following?
So you’re all set to record a piano, bravo! Just make sure to follow these few checks for optimal recording.
Adjust the piano and sound card volume

If you’re just using a MIDI cable, ignore this step – this format doesn’t record audio data. However, if you’re using a jack cable and sound card, you’ll need to find the ideal settings!
Know that there aren’t really any rules here, except to test the saturation limits. Indeed, once your equipment is connected, when you play, your sound card (at least in the case of the Focusrite) will emit a light with each note you play. Here’s what these lights mean:
- Green light: Everything’s fine, no saturation detected. The sound is clear and will be perfectly converted to digital data.
- Yellow/orange light: Warning, you’re close to saturation. Don’t panic, everything’s fine for now. It’s just an alert warning you that if you play louder than this, your sound will saturate. So be careful not to exceed this limit.
- Red light: That’s bad – your sound is too loud! It will therefore saturate (distort) and ruin your recording.
But how do you handle this then?
The technique I personally use is as follows: I put my piano sound at maximum and don’t touch it anymore. Actually, I only deal with the volume settings on my sound card. Then, I set the sound in the middle, and I play very loud chords. If it’s red, I lower it, and I play very, very loudly again. Is it green? In that case, I turn up the volume a bit, because if it stays green when playing very loudly, you won’t hear much if I play softly. The goal of the maneuver is simply to adjust your sound so that the most powerful chords in your recording don’t saturate, and therefore don’t exceed the orange light.
You therefore need to play with the volume until you find the perfect setting.
By proceeding this way, you’ll be certain to find the ideal parameters to record a piano under the best conditions!
Adjust your sound card settings
To stay with the Focusrite example, it offers several small adjustments that can improve the quality of your recording. In our case, I would recommend activating the “INST” and “AIR” buttons. Here’s their purpose:
- INST: This button simply means “instrument.” It’s therefore suited to our case and will optimize the input gain from your digital piano. This will thus offer you a more faithful recording with less distortion.
- AIR: This mode characteristic of Focusrite interfaces allows for a much clearer and more open sonic character. It’s not particularly obvious to hear, but this button greatly improves the overall quality of your recording. So don’t neglect it!
There’s also a button called “48V.” This serves to activate what’s called phantom power. But there’s no need to go into details here – it’s absolutely not necessary in our case to record a piano, so don’t use it.
Connect headphones to the sound card’s monitor output
When you make all the indicated connections, you’ll quickly encounter an annoying problem: you won’t hear your instrument anymore! Oops, not practical to record a piano… Indeed, since you’ve connected a jack cable to your sound card, it has intercepted the sound from your digital piano. How do you get it back then?
Well it’s very simple, you just need to connect headphones to your sound card. Since the jack input on it is larger than a traditional headphone jack, don’t forget to get a jack adapter.
You can obviously use something other than headphones if you feel like it! External speakers could work very well for example, but headphones are the most common option.
Start to record a piano and test the sound quality
Everything’s ready, now all you have to do is play! But before showing off your greatest artistic skills, do some tests. Start a recording and play a few melodies. Try playing very loudly then very softly, to see if nothing saturates and if everything is perfectly audible.
When listening, put on headphones to verify that sound comes out of both ears. Indeed, some software is set to stereo by default. Consequently, if you only use one input among 2 available on certain types of pianos and sound cards, you’ll only have the recording in one ear. To remedy this, switch to mono. But I can reassure you, most of the time you won’t have this problem, especially if you choose a sound card with a single jack input.
Let’s sum up
And there you have it – you’ve finally succeeded to record a piano, congrats! All that’s left is to export your audio and do whatever you want with it.
Most of the time, people also film themselves while playing, or even use effects with stunning visual results thanks to the MIDI format we discussed.
What better example than one of my favorite pianists on YouTube, Traum? A musician of exceptional talent whose superb interpretation of Liszt’s Mephisto Waltz No. 1 I highly recommend.
In any case, I hope my article has helped you see things more clearly! I must admit that when you start from nothing, it’s not obvious to know where to begin… Don’t hesitate if you have other questions about how to record a piano – I’ll be delighted to answer them. Good luck to you, and happy browsing on Best-Pianos.com!

